And for the hell of it, the rest of the pizza(s) too. What’s the point of making the crust if you don’t have the sauce and maybe how to bake it?
To forewarn you, this is not a quick process. You will have a lot of butt time (I caught up on Reddit, iFunny, Not Always Right, played multiple games of Candy Crush, and watched nearly an entire episode of How the Universe Works during my 3 hours of pizza making). So, it’s not like you’re going to be standing in the cooking room, slaving over a hot stove for 3 hours straight. You’re going to do what needs done and then go do something else. Come back, do what needs done, and go away again. As an added bonus, you can grab a cup of coffee while you’re in there.
There is also no actual set-in-stone recipe for this. But there are lots of pictures so you can see what you’re aiming for. I can give you a general idea of how much of what to use, but it has honestly never worked out the exact same way twice. Ever. My regular pizza dough with commercial yeast and semolina flour, yup… consistent quantities every time. Sourdough discard pizza dough… not so much.
Anyway, yeah, 3 hours. I was feeling particularly un-food-motivated yesterday after going to brunch with my son. I was full. Knew all day that I was *going* to make pizza, just couldn’t get my arse in the kitchen and *make* the pizza; ergo, I didn’t start this until about 6 p.m. I would usually try to start it earlier just to give it more resting time, but again, it’s a very forgiving dough and process. Give it the basics and it will perform spectacularly.
Let’s play.
The following quantities will produce 3 pizza crusts (6 people here as of last night). I always make 3 — I like leftovers. If you only need one, cut this down by 3. Again, forgiving, and no hard and fast recipe.
![20170730_180259[1]](https://erinplayswithfood.files.wordpress.com/2017/07/20170730_1802591.jpg?w=501&h=282)
Ingredients:
About 2 cups of sourdough discard
1 Cup of active sourdough starter
400 g water
700-850 g flour
1 TBl salt
That unmarked mason jar on the right is just some of my discard. See, every time I feed Igor, I need to take some of the spent stuff off, otherwise he will just grow and grow and grow and eventually it’ll be like a bad remake of “The Revenge of the Blob” and he would overtake my house. But I hate wasting that discard. First of all, that flour costs $$. If I wanted to throw it away, I would skip the middle man and just buy it, bring it home, and pitch it. Secondly, there is so much FLAVOR in the discard, it seems silly to not find a way to use it. This “recipe” came about on a night where I was all by myself and craving pizza. Started throwing stuff in a bowl. Only made one that night… and ate the whole thing. I wasn’t sharing with *anyone*. But, made more a couple days later because it was so yummy and now my family likes this one better than the standard one I created years ago and used for all those years. It’s okay though, I don’t have to pull out the Kitchen-Aid for this one.
![20170730_180615[1]](https://erinplayswithfood.files.wordpress.com/2017/07/20170730_1806151.jpg?w=358&resize=358%2C201&h=201#038;h=201 "20170730_180615[1]")
![20170730_181028[1]](https://erinplayswithfood.files.wordpress.com/2017/07/20170730_1810281.jpg?w=357&resize=357%2C201&h=201#038;h=201 "20170730_181028[1]")
Start with 400 g of water and dump into a large mixing bowl. Into that bowl of water, put your 2 cups of discard and stir until combined (the dirty water in the background of the 2nd picture is that step). Then take your cup of active starter (Igor) and dissolve that in what we will now refer to as discard water.
![20170730_181241[1]](https://erinplayswithfood.files.wordpress.com/2017/07/20170730_1812411.jpg?w=358&resize=358%2C201&h=201#038;h=201 "20170730_181241[1]")
![20170730_181610[1]](https://erinplayswithfood.files.wordpress.com/2017/07/20170730_1816101.jpg?w=357&resize=357%2C201&h=201#038;h=201 "20170730_181610[1]")
Today, for some unknown reason, I started with 600 g flour. I don’t know why. I ended up actually measuring out another 100 g, but then proceeded to add even MORE just to get it to that sticky consistency you see in the second photo. All in all closer to 750-800 g to begin with.
![20170730_181758[1]](https://erinplayswithfood.files.wordpress.com/2017/07/20170730_1817581.jpg?w=499&h=281)
Once it’s all mixed together into a relatively solid, yet probably still slightly sticky mass, cover it and let it get it’s autolyse on. For those that weren’t paying attention in sourdough school, that’s just a fancy term for “sit and soak up water and create gluteny elasticity).
![20170730_183823[1]](https://erinplayswithfood.files.wordpress.com/2017/07/20170730_1838231.jpg?w=358&resize=358%2C201&h=201#038;h=201 "20170730_183823[1]")
![20170730_183956[1]](https://erinplayswithfood.files.wordpress.com/2017/07/20170730_1839561.jpg?w=357&resize=357%2C201&h=201#038;h=201 "20170730_183956[1]")
After 1/2 hour to an hour (only gave mine 1/2 hour today), come back to your bowl and add your TBl of salt directly to the dough. Knead it in. The second picture shows exactly how much more flour this thing is going to need. Unlike with the bread where you want a wet, gloppy, sticky mess, the pizza dough needs to be more of a solid, firm, non-sticky ball of fluffy, floury goodness.
So, keep adding flour and kneading, folding it in until you attain the desired consistency. Solid. Solid is your desired consistency. Sometimes that first 700 g of flour will do it, other times like yesterday… not so much. Don’t be afraid to adjust.
![20170730_184504[1]](https://erinplayswithfood.files.wordpress.com/2017/07/20170730_1845041.jpg?w=501&h=282)
This is what your dough ball should look like. Cover it and place it in a nice cozy warm area. Personally, this is where I crank my oven to 475* to let it pre-heat, and just put my bowl on the stove.
Moving on to sauce preparation:
![20170730_190118[1]](https://erinplayswithfood.files.wordpress.com/2017/07/20170730_1901181.jpg?w=499&h=281)
While your dough is over there resting and getting a touch of yeasty action on, you’re going to go ahead and prepare your pizza sauce. Or I suppose you could just buy some… I’ve just made my own for so long it never occurs to me to purchase it pre-made. If I have tomato sauce, I have salsa and enchilada sauce and pizza sauce and pasta sauce, etc. If I have pizza sauce… well, I’d only have pizza sauce. And I can’t believe y’all actually made me write down actual, specific amounts after all these years 😐 I usually just grab a bowl and start flinging stuff in it. Have never measured it.
Ingredients:
3 15 oz cans Tomato sauce
1/3 C olive oil
2 Tbl Italian Seasoning
2 tsp salt
1 1/2 tsp onion powder
1/2 tsp pepper
You will note that there is no garlic in this. Don’t do it. I tried garlic and/or garlic powder towards the beginning of playing with this recipe and it makes it taste vomity. Garlic in Mexican food = good. Garlic in pizza sauce = barf. Have no idea why either. I absolutely ADORE garlic. It should belong in here. But don’t do it.
Also of note, this recipe calls for 3 cans of sauce. You only need two cans for the 3 pizzas. We use the leftover sauce for dipping our crusts. If you only need for the pizza, cut it back by a can and adjust everything else to match. It does NOT have to be precise. Again, yesterday was the first time ever for even acknowledging that measurements might be beneficial when trying to tell someone else how to do this.
![20170730_190446[1]](https://erinplayswithfood.files.wordpress.com/2017/07/20170730_1904461-e1501526074236.jpg?w=335&resize=335%2C214&h=214#038;h=214 "20170730_190446[1]")
![20170730_190625[1]](https://erinplayswithfood.files.wordpress.com/2017/07/20170730_1906251.jpg?w=380&resize=380%2C214&h=214#038;h=214 "20170730_190625[1]")
Pour it all in a bowl and whisk together. Set aside until needed. Go hang out somewhere else now. Your kitchen drudgery is done for another 1/2 hour or so.
![20170730_190745[1]](https://erinplayswithfood.files.wordpress.com/2017/07/20170730_1907451.jpg?w=501&h=282)
Back to the dough. As you can see in this pic, my dough is stretchy, but not stretchy enough — it’s breaking. Was also quite sticky. Looks like it was about 7:45 when I checked the dough. At this point, I added MORE flour and folded/kneaded it in, then covered it and left it to rest for about another 15 minutes.
![20170730_200023[1]](https://erinplayswithfood.files.wordpress.com/2017/07/20170730_2000231-e1501526763517.jpg?w=313&resize=313%2C226&h=226#038;h=226 "20170730_200023[1]")
![20170730_200219[1]](https://erinplayswithfood.files.wordpress.com/2017/07/20170730_2002191.jpg?w=402&resize=402%2C226&h=226#038;h=226 "20170730_200219[1]")
After that 15 mins or so, come back to it and cut your big dough ball into thirds. Take each section, flour it up and roll it into its own ball in your hands. Set it back in your bowl and cover while you prep your pizza pans.
![20170730_200320[1]](https://erinplayswithfood.files.wordpress.com/2017/07/20170730_2003201.jpg?w=261&resize=261%2C146&h=146#038;h=146 "20170730_200320[1]")
![20170730_200332[1]](https://erinplayswithfood.files.wordpress.com/2017/07/20170730_2003321.jpg?w=261&resize=261%2C146&h=146#038;h=146 "20170730_200332[1]")
![20170730_200420[1]](https://erinplayswithfood.files.wordpress.com/2017/07/20170730_2004201-e1501527867788.jpg?w=454&resize=454%2C296&h=296#038;h=296 "20170730_200420[1]")
Pour some olive oil on your pan, spread it around with your fingers, and voila! Prepped pizza pan.
![20170730_200454[1]](https://erinplayswithfood.files.wordpress.com/2017/07/20170730_2004541-e1501528067369.jpg?w=309&resize=309%2C228&h=228#038;h=228 "20170730_200454[1]")
![20170730_200504[1]](https://erinplayswithfood.files.wordpress.com/2017/07/20170730_2005041.jpg?w=406&resize=406%2C228&h=228#038;h=228 "20170730_200504[1]")
Take one of your dough balls, flatten it out a bit, place it in the middle of your pan, and stretch it as much as it will allow you to. Photographed above is how much my dough would let me stretch it on the first go. This is a good thing though. The gluten is putting up a fight and not wanting to relax. Just set this pan aside and repeat the process with the other 2. Now, travel between all three, in the order you did them the first time, and from the middle of the dough, stretch it out towards the edge of the pan. When it resists, move onto the next.
![20170730_201807[1]](https://erinplayswithfood.files.wordpress.com/2017/07/20170730_2018071-e1501528894209.jpg?w=510&resize=510%2C335&h=335#038;h=335 "20170730_201807[1]")
![20170730_201815[1]](https://erinplayswithfood.files.wordpress.com/2017/07/20170730_2018151-e1501528950684.jpg?w=205&resize=205%2C153&h=153#038;h=153 "20170730_201815[1]")
![20170730_201823[1]](https://erinplayswithfood.files.wordpress.com/2017/07/20170730_2018231-e1501528992586.jpg?w=205&resize=205%2C178&h=178#038;h=178 "20170730_201823[1]")
My 3 pizzas. The big pic there was the one that was sitting warm on top of the stove while it was getting stretched. The other 2 were away from the warms and I was going too fast so the edges got a bit torn. And on the top one some of my pan olive oil decided it wanted to become one with the toppings.
![20170730_201909[1]](https://erinplayswithfood.files.wordpress.com/2017/07/20170730_2019091-e1501529206909.jpg?w=274&resize=274%2C166&h=166#038;h=166 "20170730_201909[1]")
![20170730_201928[1]](https://erinplayswithfood.files.wordpress.com/2017/07/20170730_2019281-e1501529249545.jpg?w=274&resize=274%2C169&h=169#038;h=169 "20170730_201928[1]")
![20170730_202007[1]](https://erinplayswithfood.files.wordpress.com/2017/07/20170730_2020071-e1501529303945.jpg?w=441&resize=441%2C339&h=339#038;h=339 "20170730_202007[1]")
Ladle sauce in the middle, and using the underside of the ladle, make circles, dragging it out to the edges. One ladle full would do you. I like extra sauce so I use a ladle and a half.

Our first pizza will be plain cheese. Sprinkle on top, don’t overload, and bake at that 475* for 12 minutes
![20170730_202752[1]](https://erinplayswithfood.files.wordpress.com/2017/07/20170730_2027521-e1501536145631.jpg?w=372&resize=372%2C214&h=214#038;h=214 "20170730_202752[1]")
![20170730_203537[1]](https://erinplayswithfood.files.wordpress.com/2017/07/20170730_2035371-e1501536181910.jpg?w=343&resize=343%2C214&h=214#038;h=214 "20170730_203537[1]")
![20170730_203605[1]](https://erinplayswithfood.files.wordpress.com/2017/07/20170730_2036051.jpg?w=719&resize=719%2C404&h=404#038;h=404 "20170730_203605[1]")
Our cheese pizza in the oven about 1/2 way through cooking, our cheese pizza after those 12 minutes are up, and the bottom of the crust when it comes out.

While the first one is baking, go ahead and prep your second one to go in the oven as soon as the first one comes out. Here we are doing a pepperoni pizza with a layer of cheese and 2 types of pepperoni.
![20170730_204458[1]](https://erinplayswithfood.files.wordpress.com/2017/07/20170730_2044581-e1501536467630.jpg?w=367&resize=367%2C209&h=209#038;h=209 "20170730_204458[1]")
![20170730_205004[1]](https://erinplayswithfood.files.wordpress.com/2017/07/20170730_2050041-e1501536501370.jpg?w=348&resize=348%2C209&h=209#038;h=209 "20170730_205004[1]")
![20170730_205019[1]](https://erinplayswithfood.files.wordpress.com/2017/07/20170730_2050191.jpg?w=719&resize=719%2C404&h=404#038;h=404 "20170730_205019[1]")
Our pepperoni pizza about 10 minutes into its 15 minute bake time in the first picture. The more toppings you have, the longer your time. Second photo is when it came out of the oven, and the third is the bottom of the crust.
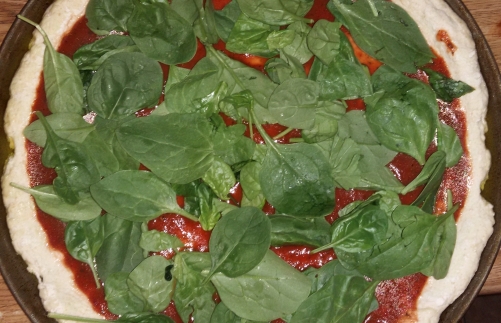
And again, prep your third pizza while the second one is baking. This next pizza is going to be yesterday’s version of a “supreme”. I loves me some spinach, even on pizza. Here you will notice that it goes *directly* on the sauce. Things don’t work out as well when you put spinach on top of cheese, so if you want spinach on your pizza, sauce, then spinach, then cheese.
![20170730_204407[1]](https://erinplayswithfood.files.wordpress.com/2017/07/20170730_2044071-e1501536848504.jpg?w=442&resize=442%2C313&h=313#038;h=313 "20170730_204407[1]")
![20170730_210638[1]](https://erinplayswithfood.files.wordpress.com/2017/07/20170730_2106381-e1501536880664.jpg?w=273&resize=273%2C144&h=144#038;h=144 "20170730_210638[1]")
![20170730_212249[1]](https://erinplayswithfood.files.wordpress.com/2017/07/20170730_2122491-e1501536911239.jpg?w=273&resize=273%2C165&h=165#038;h=165 "20170730_212249[1]")
![20170730_212303[1]](https://erinplayswithfood.files.wordpress.com/2017/07/20170730_2123031.jpg?w=719&resize=719%2C404&h=404#038;h=404 "20170730_212303[1]")
Our supreme all dressed up with spinach, cheese, pepperoni, fresh mushrooms, 1/2 red bell pepper, 1/2 yellow onion, and sliced black olives on half. With this many toppings, I started my timer with 20 minutes. I ultimately added an additional 5 minutes because the top was not quite done at that 20 minute mark. The more toppings you apply, the longer your cook time. The second picture is in the oven about half way through, the third when it was removed from the oven, and our final pic is the bottom of the crust.
This pizza dough will be flavorful and chewy. Until you get to more toppings and more time then it becomes oddly crispy chewy. Still flavorful, but crispy.
Now go make a pizza 🙂 Happy eating!!
